The Game Loop
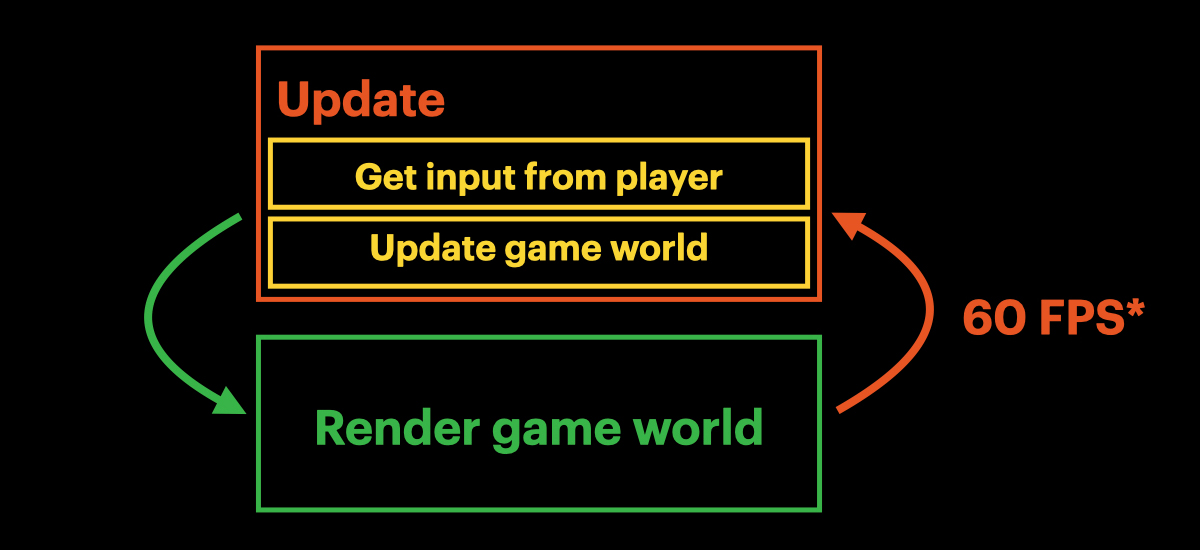
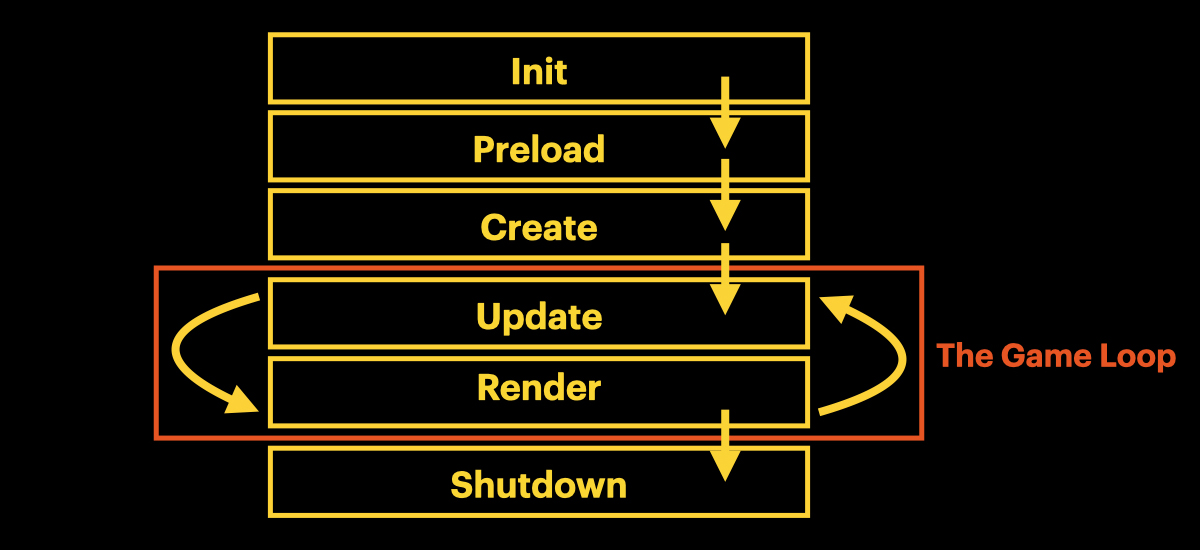
Games have a loop or "heartbeat" that allows them to continuously update and respond to events and user interactions. Within the game loop, there are numerous lifecycle events that we can either listen for or create functions that implicitly get called on their behalf. We are going to discuss the three lifecycle methods that we will utilize in our game.
Preload
The preload() method is used to load assets into the game cache before anything else is created. This is especially useful when you have a game that relies on a large number of graphics that need to be loaded before you start the game.
We will often refer to this simply as the game’s cache. Anytime we want to have an image, a spritesheet, an audio file, etc — we will want to include it in our preload() method so it is available to use and can be implemented at any point in the game.
Create
The create() method gets called after the preload() method. This is where we will delegate our creation or initialization logic.
Update
The update() method gets called on every step or "tick" during gameplay and this is where we put the logic for updating a scene and its children. For instance, in the Play scene, we use the update() method to update the Hero object as well as all of the Spiders that happen to be on the stage.
A Note On File Structure
Most of the files used in this tutorial will have two primary sections:
- Imports
- Class
The imports are required elements to bring in information from other files. If you are using an IDE, these imports may be automatically included for you. At the least, you will get an error if you are referencing something that needs to be imported. Make sure to include imports that you see throughout the tutorial. These should always be at the top of each file and outside of the export class element.
The class is a specific element that essentially groups the content of the file into an exportable object. The syntax is always export class then the class name. All of the code for that class should then go inside of curly braces ({ }).
As you go through the tutorial, be aware of correctly placing code within these curly braces so that they are part of the class. As a general rule, there should always be a final closing curly brace (}) at the end of each file. You also should never repeat a class name in a file.
Defining Our Scenes
We are going to create two scenes — Boot and Play.
-
Boot will be used to setup content and functionality for the game.
-
Play will be used to execute the gameplay mechanics.
Step 1 — Setup the Boot Class
We will start out by creating empty functions to illustrate the game loop process in the app.
The Boot class has a preload() method and a create() method. The preload() method is used to load assets into the game's cache before the game play is initialized. Essentially, we need to make these items available for the game to pull from when the item is needed.
Once the preload() function has completed, the create() function will be called which delegates control over to the Play scene and its associated class.
In Boot.ts, define the class structure with these three methods:
- constructor() {} — initializes the class and setup initial state.
- preload() {} — load assets for the game’s cache.
- create() {} — delegate control to the next scene.
We now have the basic setup for our Boot scene.
// Boot.ts

export class Boot extends Phaser.Scene {
  constructor() { }

  preload() { }

  create() { }
}
❗️ Important ❗️
Because we are writing code in snippets, you will notice “errors” in your codebase after entering certain sections of code. Most of the time, these errors will be resolved by next steps in the tutorial.
For example, there is likely an error in the constructor() {} currently saying that the method is incomplete. However, in Step Three, we will resolve this issue.
So, for the most part, don’t get too caught up in errors. Spelling errors, grammar errors, and case errors (capitalization) are certainly issues that you should be taking care of, but logic errors should not be a problem. Just make sure you are copying the code from the tutorial correctly, putting methods and properties in the correct place, and entering code in the correct files.
Another error that may result from a mistake is repeating code. For example, now that we have a preload() {} method, we don’t want to create another method called preload() in this file. Right now, this method is empty and in the following steps, we will add code to this method. A common error would be to — instead of adding code to the already created method — repeat the method name with the new code.
So, you might accidentally write something like this:
preload() {}

preload() {
	this.example;
}
What should happen here is that the this.example should just be added to the already declared method.
Step 2 — Setup the Play Class
This file will handle our gameplay scene. Start with empty functions just like the Boot class, but notice the difference as far as what this class handles in the game loop.
// Play.ts

export class Play extends Phaser.Scene {
  constructor() { }

  create() { }

  update() { }
}
It still has a constructor() {} and a create() method, but there is no preload() necessary for this file. Here, however, we’ve added the update() method that is part of the game loop.
The Play scene will handle the game’s creation logic, but then it will use the update() method to update during every step or tick in the game. Essentially, any dependent components of the game (i.e., “children) will be updated during every frame of the game’s lifecycle. All of that happens within this update() method in Play.
Step 3 — Setup the Lifecycle of the Boot Scene
Back in the in the Boot.ts file, let’s create some functionality to see how this works in the app.
Something unique about these classes are that they are extensions. This means that Boot.ts is a child (or “subclass”) of Phaser.Scene. It is utilizing the pre-established class of Phaser to determine its functionality.
For this to work, we need to initialize the superclass (i.e., the parent class that we are extending) as a part of this file. We do this by calling super() in the constructor and add the unique identifier for the scene (in this case, 'Boot'). This must be the first statement in the constructor so that we can reference other properties throughout the file.
To show how the game’s lifecycle will flow, we will add a console.log() statement in the preload() and create() methods. When we look at our browser, we should see these logged messages in our console in the order of their lifecycle.
Also in the create() method, we will add a reference to a method: this.scene.start('Play');
- We can access this now due to calling super() in the constructor; which gives us access to Phaser’s functionality.
- Phaser has a scene management system that connects all of the game objects but treats each “scene” as a distinct section of the game.
- We refer to Phaser with this and call the scene property. This includes a start method that is used to initialize a scene.
- The start() method takes one argument — the key (i.e., name) of the scene to start.
- In the Boot scene’s create() method, we want to start up the Play scene, so we will use 'Play' as the key in this method. This means that the game will transition from the current scene to the scene with the key Play — which is in our Play.ts file. This essentially takes us to that scene so that the game starts.
- We will need to setup the rest of this transition process in the Play.ts file to determine how we want the game to start and what we want it to do.
Your Boot.ts file should now look like this:
// Boot.ts

export class Boot extends Phaser.Scene {
  constructor() {
    super('Boot');
  }

  preload() {
    console.log('Boot.preload()');
  }

  create() {
    console.log('Boot.create()');
    this.scene.start('Play');
  }
}
Step 4 — Setup the Lifecycle of the Play Scene
Just like Boot — we need to add the super() method to the constructor in Play.ts.
We will also add a console.log() to the create() method and update() method to show the lifecycle process happening in our browser’s console.
The updated Play.ts file should now look like this:
// Play.ts

export class Play extends Phaser.Scene {
  constructor() {
   super('Play');
 }

 create() {
   console.log('Play.create()');
 }

 update() {
   console.log('Play.update()');
 }
}
Step 5 — Initialize the Scenes
In the Config.ts file, we need to import the scenes we just created: Boot and Play. Then we need to add these as scenes in the configuration.
- The Phaser configuration needs us to specify which scenes are included in the game. Essentially, this connects the Phaser game to use the content in our Boot and Play files.
- scene takes an array of scene objects. Because Boot and Play are both classes that extend Phaser.Scene (which we setup in their respective constructors), we can set them here to represent the different stages of the game’s lifecycle.
- This configuration object is then passed to the main Phaser.Game constructor when a new game is created and now includes whatever we put into these scenes so that a user can navigate between them.
Our Config.ts file should now look like this:
import Phaser from "phaser";
import { Boot } from './Boot';
import { Play } from './Play';

export var gameConfig = {
  type: Phaser.AUTO,
  width: 960,
  height: 600,
  roundPixels: true,
  backgroundColor: 0x000000,
  physics: {
    default: 'arcade',
    arcade: {
      gravity: { y: 300 },
      // debug: true,
    },
  },
  scene: [Boot, Play],
};
Checkpoint
Make sure all file changes are saved and bring up the game in your browser (you should have already run npm start and opened a browser to localhost:8000).
We need to open DevTools in our browser window via the Inspect option. This gives us access to our console.
In the console, we should see something like this:
Boot.preload()
Boot.create()
Play.create()
This illustrates the order in which these methods were called as a part of the game’s lifecycle.
Step 6 — Adding the Background
In the Boot.ts file, we need to build out the preload() method to setup a background image that will be a part of the game and constantly available in the game’s cache.
- To load images, we use Phaser’s load property and specify that it is an image.
- This takes a key value which we can use to reference the image: 'background'
- Followed by the actual source of the file asset: 'images/background.png'
// Boot.ts

export class Boot extends Phaser.Scene {
  constructor() {
    super('Boot');
  }

  preload() {
    console.log('Boot.preload()');

    this.load.image('background', 'images/background.png');
  }

  // ...
}
We also need to set the CORS policy and the base URL.
- CORS: Cross-Origin Resource Sharing
- This is used to set a policy for assets being loaded and is a mechanism needed to allow resources (such as fonts, JavaScript, etc) to be requested from another domain outside the origin.
- Here, we set this to crossOrigin — which means the assets being loaded are expected to come from a different domain than the game itself.
- Base URL
- Sets the URL for all subsequent asset load operations. So, when we load an asset by its file name, Phaser will add this URL to the file name to generate the full link (so that we don’t have to type out the whole thing every time).
- Here, we are pointing to a bucket in Amazon’s S3 service.
Once we add these two items, our full Boot.ts file should look like this:
// Boot.ts

export class Boot extends Phaser.Scene {
    constructor() {
      super('Boot');
    }

    preload() {
      console.log('Boot.preload()');

      this.load.setCORS('crossOrigin');
      this.load.setBaseURL('https://ninja-code-club.s3.us-west-1.amazonaws.com/');

      this.load.image('background', 'images/background.png');
    }

    create() {
      console.log('Boot.create()');
      this.scene.start('Play');
    }
  }
Step 7 — Create the Background Image in the Level Class
Now that the background image is available, we need to use it. This will happen in the Level.ts file.
First, create a new class called Level in the file and add a constructor that takes a Play scene as a parameter. This will also require importing the Play scene into the file.
- When a new instance of Level is created (i.e., when a new level starts in the game), the constructor will connect the level with the elements of a gameplay scene.
- This is denoted as private so that it can only be accessed here in this file.
// Level.ts

import { Play } from './Play';

export class Level {
  constructor(private scene: Play) {}

}
Next in the Level class, add a new method called loadLevel().
- This will be responsible for loading specific parts of a level that are necessary for the game.
- This first component we will reference is a spawnBG() method — referencing the creation of our background that is currently available. We will create this method next.
// Level.ts

import { Play } from './Play';

export class Level {
  constructor(private scene: Play) {}

  loadLevel() {
    this.spawnBG();
  }
}- You’ll notice that as soon as this is typed, your IDE will throw an error — telling you that something wrong.
- The issue is that we are referencing a method that does not exist yet.
- When a method is spurring another method, we use this to reference the other method that is set elsewhere in the file. We will use this often to help keep our codebase clean and organized but also to make sure that we are referencing the correct properties that reflect the current state of the app and the game.
To fix this error, we simply need to define the method that we are referencing — spawnBG().
- Below the loadLevel() method, create the spawnBG() method so that it adds the image we set in our Boot.ts file.
- When setting an image in the game, we are using Phaser’s add.image process which requires several details as arguments:
- x coordinate
- y coordinate
- The key for the file name that we previously established.
- This essentially tells the game where the image should show up and what image it should be.
- We also have options to add to the image and how it will interact.
- Here, we are using the setOrigin() method to make its origin 0, 0 — which means the top left of the image is the origin that all other details will stem from. This isn’t too important for a background image, but will be important for other images later in the tutorial.
- We’ve set this image as a variable using const bg. This is so that we can just use bg throughout the method to refer to the image.
The Level.ts file should now look like this:
// Level.ts

import { Play } from './Play';
export class Level {
  constructor(private scene: Play) {}

  loadLevel() {
    this.spawnBG();
  }

  spawnBG() {
    const bg = this.scene.add.image(0, 0, 'background');
    bg.setOrigin(0, 0);
  }

}
Step 8 — Incorporate the Level into the Play Scene
The gameplay needs to instantiate what is in the Level. Now that we’ve added a background to our level, we need to activate it in the game’s lifecycle — which we’ve established in the Play.ts file.
We give access to the Level by creating an instance of it in the Play scene.
- Notice that this goes in the top of the “class”. We are following the general structure necessary for a class file.
- imports
- class instantiation (export class …)
- Input() and Output() declarations (we don’t currently have any of these)
- Property instances — (i.e., level!: Level;)
- constructor() {}
- Methods — (i.e., create()). These are usually placed in the order of their use with methods that are dependent on other methods going below their “parent” method.
// Play.ts

import { Level } from './Level';

export class Play extends Phaser.Scene {
  level!: Level;

  //...
}- Now, whenever we use level in this file, it will be a type of Level — which is the class we just added the background image to.
In the Play.ts file, we are going to create a method called initLevel() which will instantiate the instance of Level that will then be assigned to the property we just created.
- This is how level gets its content — which we can use to do other things to the “Level” later.
// Play.ts

//...

export class Play extends Phaser.Scene {
  level!: Level;

  //...


  initLevel() {
    this.level = new Level(this);
  }
}- Now, the value of level will be based on whatever the current state of the Level class is (basically, whatever level we are on in the game).
Once the level property has been assigned, we can call the loadLevel() method which will load the background image.
- We do not have to recreate this process — we simply have to refer to what we’ve already made in Level.ts.
- We do this by using this, accessing the current state of the Level that we just assigned to the property level, and calling the function that exists on it.
// Play.ts

//...

export class Play extends Phaser.Scene {
  level!: Level;

  //...

  initLevel() {
    this.level = new Level(this);
    this.level.loadLevel();
  }
}
Now that the initLevel() method has this information, we can run the method as part of our game’s lifecycle.
- In the create() method, we want the initialization of the Level to occur so that any time a game is being played, the information of the level will be executed.
// Play.ts

//...

export class Play extends Phaser.Scene {
  level!: Level;

  //...

  create() {
    console.log('Play.create()');
    this.initLevel();
  }

  //...

  initLevel() {
    this.level = new Level(this);
    this.level.loadLevel();
  }
}- At this point, the only thing that will happen is that the background image will load.
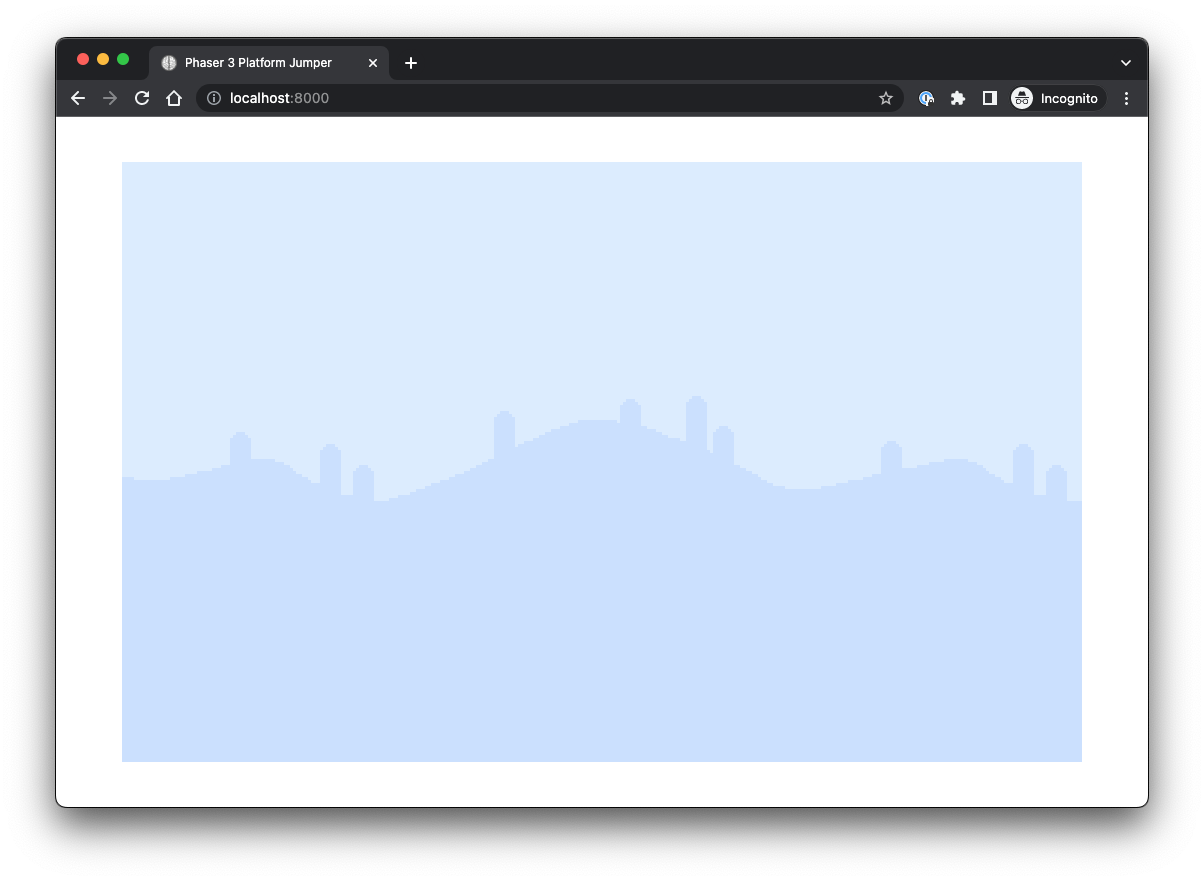
Checkpoint
Once your files are saved, the browser should refresh and instead of a black screen, we should see the background image.