Creating Platforms


Step 1 — Get the Data for the Levels
This step is important for every feature of the game we are going to add. The functionality will be implemented by the actual contents of a level. In order for that functionality to execute, it has to have the correct data.
Add the imports for each level into Boot.ts
- The data takes the form of .json — this is a different framework from what we are writing in; so, if you are going to change the data of a level, take note of its required format.
// Boot.ts

import level1 from '../data/level1.json';
import level2 from '../data/level2.json';

export class Boot extends Phaser.Scene {
  //...
}
Update the preload() method to include the json data for each level using the load property.
- This data will now be available in the game’s cache to access throughout the app.
// Boot.ts
//...

export class Boot extends Phaser.Scene {
  //...

  preload() {
    console.log('Boot.preload()');

    this.load.setCORS('crossOrigin');
    this.load.setBaseURL('https://ninja-code-club.s3.us-west-1.amazonaws.com/');

    this.load.json('level:1', level1);
    this.load.json('level:2', level2);

    // ...
  }

  //...
}
Step 2 — Load the Platform Images
In the Boot.ts file, add more images to the preload() method for the various types of terrain needed to build the levels. This will be implemented similar to the background image with a reference key and the file name.
// Boot.ts
//...

export class Boot extends Phaser.Scene {
  //...

  preload() {
    console.log('Boot.preload()');

    this.load.setCORS('crossOrigin');
    this.load.setBaseURL('https://ninja-code-club.s3.us-west-1.amazonaws.com/');

    this.load.json('level:1', level1);
    this.load.json('level:2', level2);

    this.load.image('background', 'images/background.png');

    this.load.image('ground', 'images/ground.png');
    this.load.image('grass:8x1', 'images/grass_8x1.png');
    this.load.image('grass:6x1', 'images/grass_6x1.png');
    this.load.image('grass:4x1', 'images/grass_4x1.png');
    this.load.image('grass:2x1', 'images/grass_2x1.png');
    this.load.image('grass:1x1', 'images/grass_1x1.png');
  }

  create() {
    console.log('Boot.create()');
    this.scene.start('Play');
  }
}- We now have access to a 'ground' platform and various platform dimensions that will get set on the screen.
- When one of these “keys” (such as 'grass:8x1') gets set in a level.json file and is part of the Level and Play classes, we can access the actual image from here in our cache that has been preloaded. We will being doing this for images, animations, and audio throughout the tutorial.
Step 3 — Create a Way to Access Levels in Play.ts
In the Play class — where we are creating the scene for gameplay — we need to set a property for determining which level we are on.
- This will be of type integer
- We are going to start this at 2 so that when we are testing the game during development, we can use the second level (which has more features than level 1) to make sure everything is working correctly.
// Play.ts
export class Play extends Phaser.Scene {
  level!: Level;
  currentLevel: integer = 2;
  //...
}
To access a level — create a method called gotoLevel() that will take an argument for a level.
- The logic of this method should be to call loadLevel() (a method we set in the Level class) on the level property and pass a means of getting the key for a level from the cache.
- This method should be set to private so that it cannot be accessed out of the scope of this class.
Change the initLevel() method so that it no longer calls this.level.loadLevel().
-
We are changing the process by which we access multiple levels.
- We have a way to load a level and get the data for that level — loadLevel() in the Level.ts file.
- We have a way to go to a level — private gotoLevel(level) — which then calls the loadLevel() method.
- We set the level in initLevel() — which creates a new instance of Level and calls the gotoLevel() method which sets the level to whatever the currentLevel property is.
Add the gotoLevel() method in the initLevel() method.
// Play.ts
export class Play extends Phaser.Scene {
  //...

  create() {
    console.log('Play.create()');
    this.initLevel();
  }

  //...

  initLevel() {
    this.level = new Level(this);
    this.gotoLevel(this.currentLevel);
  }

  private gotoLevel(level) {
    this.level.loadLevel(this.cache.json.get(**level:${level}**));
  }
}- You will notice an error — this is because we have included an argument (inside the parenthesis) of the loadLevel() method, but we did not give that method parameters. We will fix this in the Level.ts file next.
Step 4 — Create Settings for the Platforms in a Level in Level.ts
To access the details for our platforms, create a platforms property in the Level class and assign it to the type Phaser.Physics.Arcade.StaticGroup. This should go at the top of the class (right under export class Level { and should have a required (or, “non-null”) assertion operator (!).
- The Phaser.Physics.Arcade.StaticGroup is used for static (non-moving) physics objects within gameplay. This makes it so that they are not affected by the physics forces of the game.
In the constructor() {} — initialize the platforms property by calling this.scene.physics.add.staticGroup();
- We are accessing the scene property of the Play class and adding the staticGroup() to the physics property.
- This is assigned to the platforms property we created.
- This sets the platforms to hold static physics objects in the games — essentially, this makes it so that we can have characters stand on these platforms.
// Level.ts
export class Level {
  platforms!: Phaser.Physics.Arcade.StaticGroup;

  constructor(private scene: Play) {
    this.platforms = this.scene.physics.add.staticGroup();
  }

  //...
}
Create two methods to handle the setup of the platforms: spawnPlatforms() and spawnPlatform() with each taking a parameter. One of these methods will handle the details for creating a single item and another handles creating the entire collection for a level by delegating the single method.
- Then, update the loadLevel() method to call the spawnPlatforms() method using data.platforms as our argument which comes from the JSON files we loaded inside the Boot class.
- loadLevel() should also take a parameter now — this will resolve the error in the Play.ts file.
// Level.ts
export class Level {
  platforms!: Phaser.Physics.Arcade.StaticGroup;

  constructor(private scene: Play) {
    this.platforms = this.scene.physics.add.staticGroup();
  }

  loadLevel(data) {
    //...
    this.spawnPlatforms(data.platforms);
  }

  spawnPlatforms(platforms) { }

  spawnPlatform(platform) { }

  //...
}
Create the logic for spawnPlatform() and spawnPlatforms().
-
The singular spawnPlatform() should define a _platform as a variable (which is different from our platform property — this is why we add the _) then add a sprite to the scene by accessing the JSON information (which will set the x and y coordinates as well as texture values.
- The result of adding the sprite to the scene is then assigned to the _platform property — which allows us to perform additional operations on it.
- A sprite is an object that is used to display a single image or animation in a game so that they can interact with other game objects and the game itself.
- We also need to set an origin point of the sprite image — this is where the “starting point” of the game object is. This gets registered as coordinates on the setOrigin() method.
- Finally, we return the variable to the calling function to be executed.
- The result of adding the sprite to the scene is then assigned to the _platform property — which allows us to perform additional operations on it.
-
The plural spawnPlatforms() method is the calling function — this will loop over the platforms data and execute the logic of spawnPlatform() for each value in the collection so that we can add information for many platforms at once and make it vary based on the specific level we are on.
- For each platform that has been acted upon by spawnPlatform() — this method carries that out and then adds the returned sprite to the platforms static group we instantiated in the constructor.
// Level.ts

spawnPlatforms(platforms) {
  platforms.forEach((platform) => {
    const _platform = this.spawnPlatform(platform);
    this.platforms.add(_platform);
  });
}

spawnPlatform(platform) {
  const _platform = this.scene.add.sprite(
    platform.x,
    platform.y,
    platform.image
  );
  _platform.setOrigin(0, 0);
  return _platform;
}
The Level class should now look like this:
// Level.ts
import { Play } from './Play';
export class Level {
platforms!: Phaser.Physics.Arcade.StaticGroup;
constructor(private scene: Play) {
this.platforms = this.scene.physics.add.staticGroup();
}
loadLevel(data) {
this.spawnBG();
this.spawnPlatforms(data.platforms);
}
spawnPlatforms(platforms) {
platforms.forEach((platform) => {
const _platform = this.spawnPlatform(platform);
this.platforms.add(_platform);
});
}
spawnPlatform(platform) {
const _platform = this.scene.add.sprite(
platform.x,
platform.y,
platform.image
);
_platform.setOrigin(0, 0);
return _platform;
}
spawnBG() {
const bg = this.scene.add.image(0, 0, 'background');
bg.setOrigin(0, 0);
}
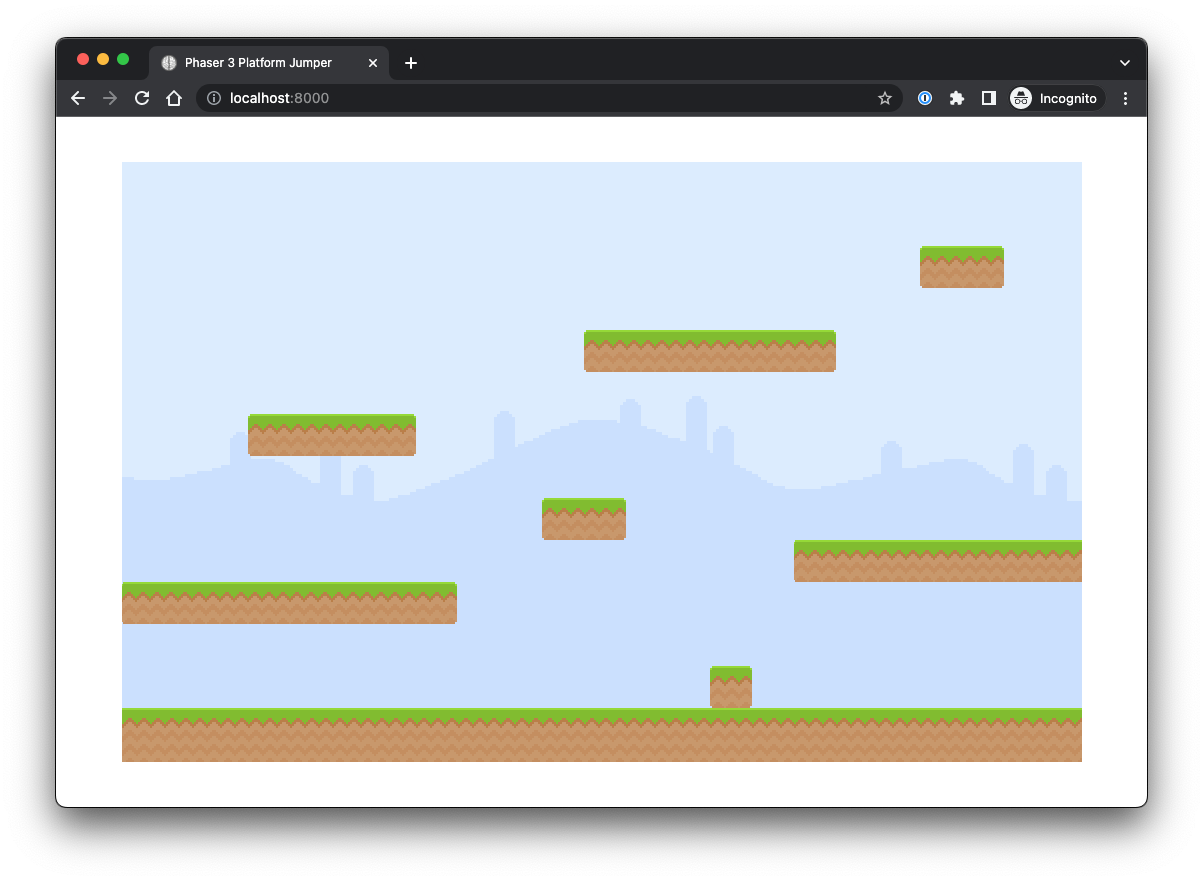
}Checkpoint
- You should have a collection of platforms of various sizes and locations on the screen.
- This should reflect the data of Level 2 as we set the currentLevel to “2”.